Recently, we have been covering the Karbonn A12+ smartphone. Earlier, we did a detailed review of the budget smartphone and posted a guide to help users root and unroot it.
Note: I have ported the Clockworkmod Recovery to Karbonn A12+ myself, thanks to MTK Droid Tools. All the options in clockworkmod recovery are working to the best of my knowledge. If you find any bugs, do report. Please don't mirror the file and wherever you share the link, keep a link to this article.![]()
Once you have rooted any Android smartphone, the next step is to install a custom recovery so that you can have full nandroid backups which can be restored in case anything goes wrong. For more details on clockworkmod recovery and why you might want to install it on an Android device, read this article.
There are two methods to install clockworkmod recovery on your Karbonn A12+. The main methodology behind both of them is the same, it is just that one of them makes the task easier for you.
Note: I have ported the Clockworkmod Recovery to Karbonn A12+ myself, thanks to MTK Droid Tools. All the options in clockworkmod recovery are working to the best of my knowledge. If you find any bugs, do report. Please don't mirror the file and wherever you share the link, keep a link to this article.

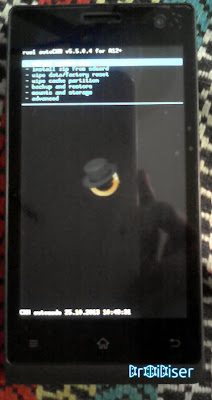
Installing Clockworkmod Recovery on Karbonn A12+
The Lazy Method:
If you are sure that you have installed proper drivers for your phone on your Windows PC, use this method. Else, skip to the other one.
- Download and extract CWM Droidiser Toolkit for Karbonn A12+.
- Connect your phone to the PC using USB cable. Make sure that the phone is connected as USB Storage but USB Storage is turned off.
- Enable USB Debugging on your device by going to Settings > Developer Options.
- In the extracted folder, run the Double Click This.bat batch script.
- Follow the instructions in the command prompt.
- Running that script file will install the Mobileuncle app on your phone and send the recovery.img to your sd card.
- Open your phone's app drawer and run Mobileuncle Tools app.
- Select Flash Recovery from sdcard option.
- Tap on recovery.img and then confirm the process in the popup dialog.
- Your phone will automatically reboot into recovery.
The Normal Method:
- Download and extract CWM Droidiser Toolkit for Karbonn A12+.
- Copy the Mobileuncle.apk and recovery.img file to the root of your sdcard. Here, root of the sdcard means outside any folders and the sdcard to be used is the external sdcard.
- Install Mobileuncle.apk file using any file manager on your phone. To do this, you must have enabled installation of apps from Unknown Sources. This can be done by going to Settings > Security > Unknown Sources.
- Run the Mobileuncle Tools app and select the Flash Recovery from sdcard option.
- If recovery.img is copied to the correct location, it will appear in Mobileuncle Tools at this point. Tap on recovery.img file and you will be asked if you are sure about what you are doing. Confirm the action.
- Your phone will automatically reboot to recovery mode.
This video shows how the process appears runs on the phone.
Though the phone will automatically boot into recovery mode for the first time, later on you will have to do that by pressing a key combination. When your Karbonn A12+ is switched off, press and hold Volume Up and Power button. In the subsequent screen, you will be presented with the option to boot in to Fastboot Mode, Recovery Mode or Normal Boot. Use Volume Up button to scroll through the options and to get to the Recovery Mode option. Now select this option by pressing the Volume Down button and you will be welcomed in the recovery mode.