I had received a few requests about the rooting method for Lava Xolo Q800, and it's time for me to write one. Just like most phones on which bin4ry root tool doesn't work, clockworkmod recovery had to be ported to this device so that superuser could be flashed. The credit for porting clockworkmod to the Xolo Q800 goes to Sameer@X, a really new (and talented) member on xda.
If you are hearing about the term "Rooting" for the first time, you might be wondering, "What does rooting anWhat is rooting" and "The crazy list of things that you can do only if you are rooted". If you are a readaholic, you might also want to learn more about clockworkmod recovery.
![]() Android device means", or "Why risk your warranty for Rooting?" I have covered these questions in my previous articles "
Android device means", or "Why risk your warranty for Rooting?" I have covered these questions in my previous articles "
Before You Proceed Further:
If you are hearing about the term "Rooting" for the first time, you might be wondering, "What does rooting anWhat is rooting" and "The crazy list of things that you can do only if you are rooted". If you are a readaholic, you might also want to learn more about clockworkmod recovery.

Before You Proceed Further:
- Rooting will void your manufacturer's warranty.
- Neither me nor anyone else on this planet can be help responsible for anything bad happening to your device.
- Charge your battery to decent levels so that your phone doesn't shut down amidst the process
Stuff you would need:
- SP Flash Tools zip
- Clockworkmod Recovery zip
- Drivers for your phone
- A Windows 7/XP based computer/laptop
- A Lava Xolo Q800 :P
The guide involves two steps:
- Installing clockworkmod recovery on your device
- Flashing superuser app through the cwm recovery
How to Install Clockworkmod Recovery on Lava Xolo Q800:
- Install drivers for your phone using the drivers file provided above, or using pdanet to install drivers. Disconnect your phone after driver installation is done.
- Extract the Flash tools zip file and the cwm recovery zip file to any folder you want.
- Start SP_Flash_Tool.exe
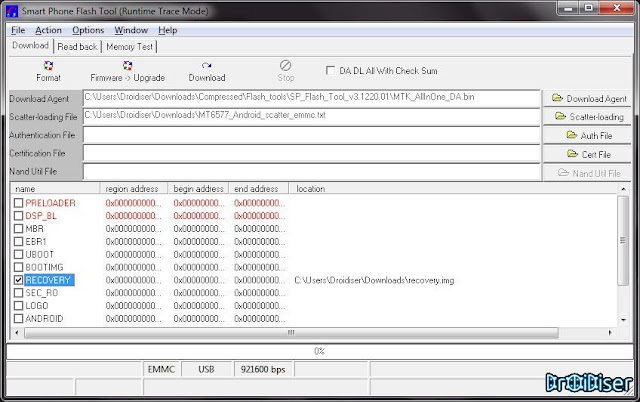
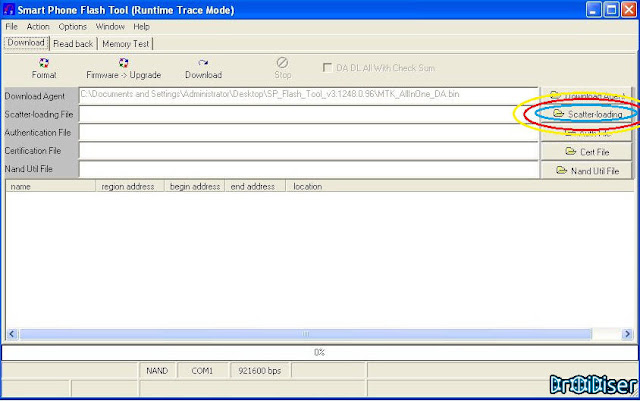
- Click on Scatter Loading button. A pop up window will ask you to locate the scatter file. You can find the "MT6589_Android_scatter_emmc" file in the folder in which you extracted clockworkmod recovery.
![]()
Click the Scatter loading button and locate the scatter loading file - In the list of partitions that appear after the scatter file is loaded, untick everything except recovery. Then click on recovery, it will ask you the location of the recovery file, which is, again, present in the folder in which you extracted clockworkmod recovery zip.
![]()
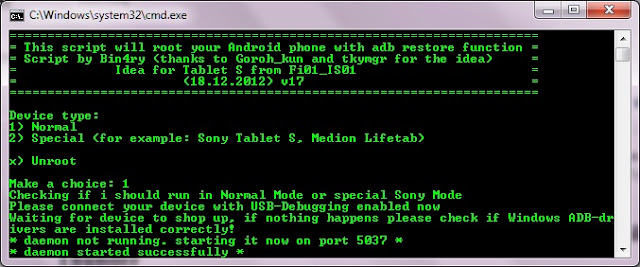
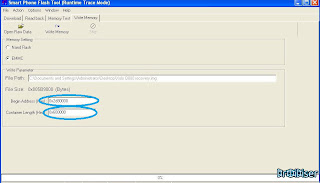
Tick the Recovery checkbox - In the menu bar, go to Window and select the option "Write Memory". Then, in the Write Memory tab, check the EMMC radio box.
- Under "Write Parameter" heading in the same write memory tab, click on Open Raw Data and locate the Recovery.img file.
- Finally, change the Begin Address to 0x2d80000 and container length to 0x600000.
![]()
Enter the values in the highlighted boxes - Click the write memory button (the one adjacent to the Open Raw Data button). Switch off your phone and connect it to the pc. The progress bar, present at the bottom of the Flash tools, will start moving. Once the process completes, a green ring will appear in the flash tool, which means everything went fine and the clockworkmod recovery is flashed successfully.
Tip: If you want to flash TWRP recovery instead of clockworkmod recovery, just use this recovery.img instead of the one that is present in the clockwormod recovery zip file.

Now, we shall move on to the second step, after which you would be a proud owner of a rooted Xolo Q800.
How to Root Lava Xolo Q800:
- Transfer this file to your device's sd card.
- Switch off your device.
- Press Volume Up + Power button simultaneously till the phone boots up. Press Volume Up to boot into clockworkmod recovery.
- Use Volume Up and Down buttons to select the "Install Zip from sdcard" option by pressing the power button.
- Locate the file you transferred to your sdcard in step 1.
- Let the flashing process complete.
Congratulations! Your hard work (and mine too) has paid off. You can now try out all those rooting benefits you had been drooling for forever. Post any issues with this guide in the comments box below. Do follow us if you find our articles helpful.