Quantcast
Channel: Droidiser
Viewing all 557 articles
Browse latest View live

Ubuntu to collect $32 mn for its cutting edge Ubuntu Edge, packs 4 GB RAM & 128 GB Internal storage

$
0
0
After the announcement of Ubuntu OS for mobile, here comes the next major announcement from Mark Shuttleworth, Founder of Ubuntu. Ubuntu has kick started a new project for an upcoming smartphone called the Ubuntu Edge. According to Shuttleworth, he aims to provide a testbed with cutting-edge technologies for the mobile phone industry, similar to what Formula 1 does for racing.

A campaign started at Indiegogo reads $3,445,687 out of $32,000,000 collected. With 30 days still remaining of its one month long campaign, looks like Ubuntu will be able to get to its goal of quite 32 million dollar easily.

Here are the various specifications of the Ubuntu Edge:

  • Dual boot Android and Ubuntu OS
  • Integrated Ubuntu Desktop PC when docked
  • A fast multi-core CPU (not decided/announced yet)
  • 4 GB of RAM
  • 128 GB of Internal storage (or should we say hard drive?)
  • 4.5 inch 720p screen
  • Sapphire crystal display (can be scratched only by diamond)
  • Stereo speakers with HD audio
  • Dual LTE
  • Silicon Anode Li-ion battery
  • 8 MP rear camera, 2 MP front camera
  • Dimensions: 64x9x124mm
As point number 2 says, whenever you have access to a standard HDMI screen, you can connect your phone to have a full blown PC with Ubuntu Desktop OS. Now, that is one thing we haven't even heard of in any smartphone till now. Ubuntu also makes it clear that all the specifications mentioned above are fluid and might change at the actual time of mass production.

A maximum of 5000 early birds were allowed to book themselves an Ubuntu edge for $600. The phone has already sold out for that price and now the phone is up for booking at $830. Ubuntu has confirmed that they will test the interoperability with networks in Europe, US and India, among others.

Just like Android OS, users will be able to tinker with the hardware and to upload custom software builds for the phone. Also, official developer builds will be released daily (I wonder what they will keep adding to the phone daily) and stable releases periodically. Akin to Android recovery, Ubuntu recovery will allow users to get back to factory state on the sign of panic.

Pricing of Ubuntu Edge:

Though many of you might have got disheartened by the $830 current price tg of the phone, Ubuntu has made it clear that the company has set such a high funding target to bring the final cost of the unit down. You might wonder  why you should pre-book one, when the final prices might be actually cheaper. For those who pre-book the device will get their name placed on Ubuntu Edge Founder page. Though if you are only interested in getting your name on the Founders Page, you can get those privileges by contributing $20 to this campaign.

Ubuntu also stated that in case they fail to reach their goal of $32 mn, all contributors will get their money back and their would be no Ubuntu Edge, ever. Period.

So if you felt hiccups while reading those specs, have a special place in your heart for anything that is Open Source and have enough currency in your pocket, go support this campaign over here.

Watch Mr. Shuttleworth tell more about the Ubuntu Edge

Your views about the Ubuntu Edge are being eagerly awaited in the comments section. Share this too-good-to-be-true phone with your friends to let them know and to probably introduce a new contributor to the Ubuntu Edge campaign. 

GravityBox brings hoards of tweaks and fixes to Mediatek MT6589 powered Android Devices

$
0
0
One of the very few reasons I dislike cheaper Mediatek powered Android devices is the lack of development efforts that happen for such devices. With heavyweight retailers such as Sony deciding to compete with the cheaper Asian and Chinese brands and using Mediatek processor in their device, this chipset is surely set to gain a lot of developers’ attention. A Slovakian XDA member spent lots of time coding to create a Xposed Module intended to work on all Mediatek MT6589 android devices that run on Android version 4.2.1 or above. Two such devices that quickly came to my mind are the Micromax A116 Canvas HD and Micromax Canvas 4, along with lots of other local popular devices.

If you own one such device and are continuously bugged by the typical MT6589 bugs, then you would have been unconsciously waiting for such thing to happen. Let us discuss about what the app packs.
Image credits: C3C076 on xda

Bug Fixes:

There are some known bugs that are usually encountered by MTK MT6589 device users. GravityBox promises to fix the following such bugs (along with a few others):
  • Date & Time Settings crashes are fixed
  • Caller ID Mismatch is fixed
  • Brings the extended developer options that are generally missing on MT6589 devices

Mods and Tweaks:

These are some additional features that can be optionally installed on a MT6589 device.
  • Manage the Quick Settings Tile present in status bar
  • Control your Status bar’s color and transparency
  • Network signals for empty SIM slots can be hid automatically
  • Long press volume keys to change your current track
  • Clear all recent apps at once (as in Touchwiz)
  • Disable LED while charging or the flashing of LED when the battery is low
  • Full Screen Caller ID
  • Advanced options in Power-off menu (that appears on long press of Power button)
If the list of things above that you can have on your device is driving you crazy, here are the things you must do to get it.

How to Install GravityBox on a Mediatek MT6589 Android Device:

  • You must have rooted your phone and have a custom recovery like clockworkmod, else you won’t be able to use this mod. Such system level changes can be brought about only if you are rooted.
  • Boot in to your custom recovery and take a backup. Skip this step only if you have a recent nandroid backup already with you. (Read more about nandroid backup and clockworkmod recovery)
  • Download the latest Xposed installer from the official xda thread. Install it like you would normally sideload an app.
  • Open Xposed Installer and click Install/Update. Reboot your phone and you are done with installation of the Xposed framework.
    Note: If your phone doesn’t reboot after this, that indicates that your phone isn’t compatible with the Xposed framework and you, sadly, won’t be able to use GravityBox. Restore your nandroid backup and get back to normal life.
  • Download the latest version of GravityBox apk file from this xda thread. Rename this file to GravityBox.apk
  • Install GravityBox.apk and then launch Xposed Installer. In Xposed Installer, jump to Modules tab and tick the GravityBox checkbox to activate it.
  • Reboot your phone, again.
  • Now, you can launch GravityBox as a normal app, from the app drawer.
  • Use the features/mods that you want to!
And hey, don’t forget to share this story with your friends and your views with us. These are the driving force behind every author.
P.S. GravityBox is an open source project. View the github sources here.

Deal Alert: Get Samsung Galaxy S4 for just Rs. 33,790

$
0
0
If you were waiting for a price drop to get yourself a Samung Galaxy S4, this is the time to do it. The fastest selling device from Samsung is now available from Tradus for an astonishing price tag of Rs. 33,790 ($572), including shipping charges. For those who are unaware, the phone was launched for a bulky Rs. 41,500 ($702), thus the offer will save you nearly 8k bucks.

How to get the Galaxy S4 deal:

  • Go to the deal page. Click Buy Now on the seller with the least price.
  • After you have logged in (or registered) to Tradus and have given your Shipping Address, enter DESIM10 coupon code in the Redeem Gift Voucher field and click Redeem.
  • You will have to give a missed call on a number displayed in the browser page within 10 minutes to get the benefits of the coupon code.
  • Pay the balance amount with Credit/Debit card or Net Banking and place your order.


Here are some quick specs of the device for those of you who live under some rock or were buried in a glacier since the Ice Age:
  • 1.6 GHz Octa Core processor
  • 2 GB RAM
  • 13 MP rear camera, 2 MP front camera
  • Smart Scroll and other smart features
  • 16 GB internal storage (in the model you will be buying using this deal)
If you are looking around for alternatives instead, you can get the LG Optimus Pro or HTC One, but for a significantly higher price than this deal offers for the Galaxy S4, the latest and greatest from Samsung.

Do share this deal with your friends, so that no potential buyere of the S4 misses out on this deal!

Unexpected Sale: Flipkart pricing error puts HTC One X on sale for INR 19k; Sells out

$
0
0
About 3 days back, Flipkart listed HTC One X for ` 19k, probably by mistake, but netizens grabbed at this chance like hungry cats and the product was sold out within hours of the deal going live.

Discussions going on at Desidime suggest that Flipkart might have meant to add a cashback offer of `800 but ended up offering a a hefty cashback of  ` 8000. For those who used Citibank cards for payment got an additional 10% off, thus bringing effective price further down to a hilarious `17,100. Such deals are easily brought to the attention of the masses by deal discussion forums such as Desidime and thus the shiny new (but still over a year old) HTC One X got sold out within literally hours of the deal coming into attention. To remind you, the phone was launched for MRP `43k tag in April 2012.

Those who had bought it were first fearing that their orders might be cancelled citing wrong pricing, a thing Flipkart has done a few times in the past. But to their surprise and happiness, almost everyone got notifications from Flipkart about their item getting shipped. Packrat, a Desidime member, posted a snapshot of the package box along with the bill he received.

Box Pack of one of the cheapest HTC One X ever sold
When the phone did come back in stock later yesterday, it was priced at its current market price of `26,999, with a new offer that included a free micro sd card and zero percent emi scheme on Citibank EMIs.

Though the phone was released last year and has some outdated specs, especially if compared with current industry heavyweights like HTC One and Samsung Galaxy S4, if the price of this device are brought down to such low levels permanently, it would just sweep the mid-end market currently dominated by the likes of Lava Xolo Play and Micromax Canvas 4.

Though HTC has no previous record of doing so, we can just dream of a day when we shall be able to buy a phone with same specs and price as that of a Micromax phone but with a brand name of HTC. I also hope that Micromax doesn’t sees it the other way and starts pricing its future handsets insanely :P

Exclusive: How to Root Xolo Play T1000 in 7 easy steps

$
0
0
Xolo Play T1000 has emerged as a serious competitor to the Canvas 4 smartphone and is gaining some serious love from people looking to buy a phone in that price range. The phone packs a premium look along with some powerful specs under its hood, making it a good deal for those who don’t want to pay extra money just for a better brand name. For those of you who have already bought this phone or are looking forward to it, here is a simple rooting guide that will let you root your phone in just 8 steps. We can promise you one thing, you won’t find a guide as simple and explained as ours. At least if it’s not copied later on.

Before you proceed here are the various things that you must give a read:
  • Rooting any Android device will void its manufacturer warranty. In cases of some of them, unrooting restores the warranty. But in case of others having locked bootloaders (like in some HTC & Sony smartphones) or flash counter (like in some higher end Samsung smartphones), unrooting might not be able to restore warranty. Make sure that you understand the seriousness of what you might be doing to your phone by following the guide posted below.
  • If you are unsure whether rooting is worth all this risk, have a look at the perks of rooting.
  • Make sure that your Lava Xolo Play T100 isn’t already running low on battery. While rooting Xolo Play, I bet you won’t it to die down.
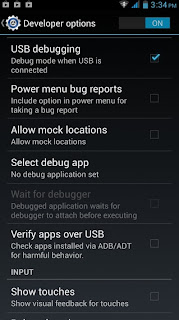
  • Make sure that you have enabled USB Debugging on your Xolo Play. To do this, you should go to Settings > Developer Options and enable USB Debugging by checking the checkbox. This is required so that your computer is able to communicate with your phone. If in future, Xolo Play gets an Android 4.2 update, you can enable USB Debugging by first going to Settings > About phone and tapping the Build Number field 7 times. This will unlock Developer Options on your phone. Now, go to Settings > Developer Options and enable USB Debugging as you would normally do.
  • This guide has been tested working on Windows XP/ Windows 7 PC. Still, it should work perfectly fine on Windows 8 too. Linux and Mac are unfortunately not supported.

Root Lava Xolo Play T1000: Guide

  1. Install drivers for your Xolo Play using Pdanet.
  2. Connect your phone to your PC using USB Cable.
  3. Download and extract MotoChopper. This tool was meant for rooting Droid Razr HD, but works great for this phone as well. (First tested by deepaktom)
  4. In the folder in which you extracted MotoChopper, right click the file named Run.bat and select Run as administrator.
  5. You might see a popup on your phone asking you to grant permissions to Motochopper to bring about the required changes on your phone. Your device should reboot now.
  6. Once the reboot is done, go to your app drawer and spot the Super Su app. Open this app and select the option to update binary.
  7. You can optionally update Busybox using Busybox Installer by Stericson.
At any stage of time, if you need to unroot your Xolo Play, download OTA Rootkeeper from the Play Store and open that app. Then click on Temp. Unroot and your phone will be unrooted till you install a superuser app and its binaries.

Your feedback is (awaited and) most welcomed in the comments section.

How to download all photos from a Facebook Album at once

$
0
0
There can be a lot of situations in which you might want to download all the photos a Facebook album contains. When the number of photos present in a Facebook album is in hundreds, you won't even dare to think of opening every single photo and click the Download button every time to download each of them. To save you from this hassle, we shall help you get hold of all the pics present in a Facebook folder in just a few clicks. So, if you want to download full Facebook album, keep reading.
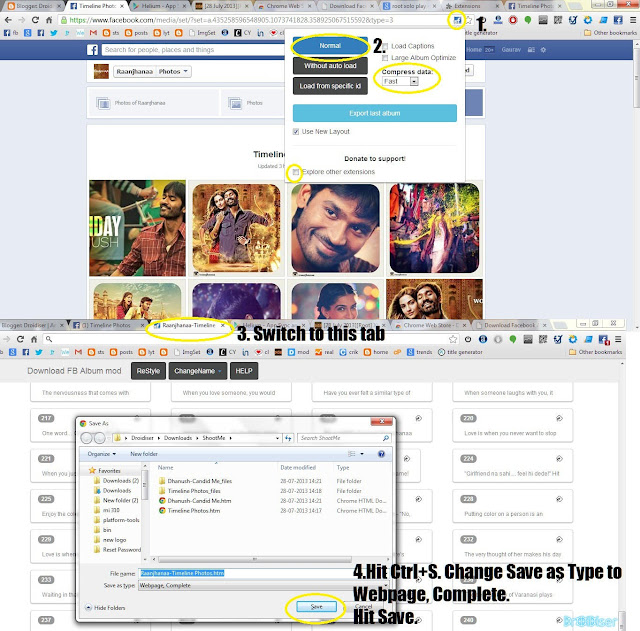
The images will show up like this, in your browser

How to Download Full Facebook Photo Album at once:

  • Download FB Album Mod extension. You must be using Chrome to use the extension we are going to use. A greasemonkey script will make it work on Firefox too, but we shall be guiding you for Chrome only.
  • Once installed, go to the Facebook album you want to download. All albums can be accessed by going to the Timeline of the person/page whose album you want to download. Then click on the Photos link there. You will see a few tabs named Photos of XYZ, Photos and Albums. Click Albums.
  • Open the album you want to download. Now, click on the Facebook icon appears in the address bar (or Omnibox). It is sitting beside the Bookmark icon.
  • A small floating window will appear on clicking this button. In this window, untick the Explore other extensions checkbox. If you are downloading an album with lots of photos, tick the large album optimize checkbox.
  • Hit the bluish Normal button.
  • After some time (depending on the number of photos you are trying to download), a new tab will appear in your browser. Jump to that tab.
  • In that tab, hit Ctrl. + S  key combination. In the popup window that appears asking you the location where you want to save the web page, change the Save as Type dropdown's value to Webpage, complete.
  • The webpage will now be saved on your PC. Whether online or offline, open that file in your favorite browser (in our case, it is Chrome), click on any photo to enlarge it and use arrow keys to navigate through them. See the first image to have an idea about how the images show up in the browser.
If you are interested to know whose album I downloaded, it was Raanjhanaa's official page's album which contained about 240 images. The movie has been giving me sleepless nights since the day I have watched the movie. Haven't been impacted so much by any movie before. Droidiser would be the last place you look to get a movie recommendation, but seriously, if you haven't watched Raanjhanaa, go do it now. It is still running in a few theatres.

Share this awesome tip with your friends to let them download someone's Facebook Album without going through the hassle of saving all of them one by one.

New Nexus 7, with the sharpest 7" screen ever, available in India for INR 19k

$
0
0
Google, as always, hasn't included India among the first countries to receive some Nexus love. But thanks to a seller on Ebay.in, the Indian version of the online mega-retailer, the new version of Nexus 7, which was announced on 24th July, Indian fans of the Android OS can get their hands on the New Nexus 7 as sson as in the first week of August.

The 16 GB WiFi version of the tablet is available for INR 19,000 while 32 GB WiFi version can be bought for INR 22,000k. According to the seller, the tablet will be imported from USA and will be shipped by FedEx. Expected delivery time is about 10 days from the date of order. The tablet will come with international warranty. The prices include the shipping charges and you won't need to pay any import duty. The modes of payment doesn't include Cash on Delivery, as expected.
You can get one here.

Nexus 7 Specs Sheet:

  • 7 inch screen with 1920x1200 resolution
  • With 323 ppi, this is the sharpest display ever for a 7 inch tablet
  • Android 4.3
  • Corning Gorilla Glass
  • 1.5 GHz Qualcomm Snapdragon S4 Pro
  • 400 MHz Adreno 320 GPU
  • 2 GB RAM
  • 16 GB Internal Storage
  • 5 MP auto focus rear camera
  • 1.2 MP fixed focus front camera
  • Weighs 290 grams
  • Dimensions:  114 x 200 x 8.65 mm
  • Wireless Charging
  • 3950 mAh battery, lasts up to 9 hours of active usage

Droidiser Recommends:

If the specs woo you and you need a tablet, this one will be a wise choice. You won't get any smartphone with such specs at a similar price, at least not from a known brand. Add to this the fact that it is a Nexus device and would enjoy regular updates from Google for quite some time and you won't want to miss having it on your shelf.

How to set an image slideshow as wallpaper on an Android Device

$
0
0
In a previous post, we learnt how to download a Facebook Album without going through the hassle of saving each image individually. After I downloaded the Facebook album, the next thing I wanted was to use the album slideshow as wallpaper on my Karbonn ST8 Velox Android tablet. Thus began my crusade for looking out for an app to do this job. I stumbled upon a few, gave them a try and am here to share the best one to do this job for you- Multipicture Live Wallpaper.

Multipicture Live Wallpaper is a highly customizable app that allows you to use a slideshow of a group of images as your wallpaper.The app packs many options that allow you to select the transition animations (it packs a few really nice ones), time it takes to change pictures, lock screen options and a bunch of other options that most of you won't care to change.

If you have a device that is low on RAM (<1 GB), you should go to the live wallpaper's settings and change Maximum Memory Usage to Small. Also, when you reboot your device or disable USB Storage mode, the slideshow might take some time to load again.

Watch this video to see how it works. The transitions might not work as smoothly as they would when you try out the app yourself because the screencasting app I use shoots videos at low fps.

Download Multipicture Live Wallpaper on any of your Android devices that runs on Android 2.1 or up and enjoy the beautiful slideshows. The beauty, though, depends on whether you are using beautiful images in the slideshow. :P

Do let us know of any other related app that does the same job in a better way. On a different note, I hope my Raanjhanaa fever dies down soon.

How to root Micromax Canvas 4 A210 in 5 minutes

$
0
0
Micromax Canvas 4 might have faced criticism for packing nothing new, but still the popularity of the Canvas series still managed to lure decent buyers for the device. If you want to root Micromax Canvas 4 A210, this easy guide will help you do that in a matter of minutes.

Before you Proceed:

  • Rooting has its advantages and disadvantages. Make sure you know about them before you proceed with this guide.
  • Rooting any Android device will void its Manufacturer warranty forever. Though, unrooting reinstates the warranty in most cases.
  • Plug your charger and charge your Canvas 4. Don't begin with the steps given later on in this guide if your phone is already low on Battery.
  • If you face any trouble, use this guide to flash stock rom on your Canvas 4. This will make your phone's software as good as new.

Requirements:

  • Enable USB Debugging. This is generally done by going to Settings > Developer Options and then ticking the USB Debugging checkbox. But as Canvas 4 runs on Android 4.2, you will need to unlock Developer Options first. To do this, you will need to go to Settings >About Phone. Find the  ABout Phone field there and tap it seven times. This will unlock your Developer Options option in Settings, from where you can enable USB Debugging. To confirm that USB Debugigng has been enabled, try connecting your phone to your PC and you should see a notification saying USB Debugging Connected.
  • Install drivers for Micromax Canvas 4 using pdanet. This is the most important step to root Microamx Canvas 4. Without the drivers, your PC won't be able to communicate with your Canvas 4.

Rooting Micromax Canvas 4 A210:

  • Download Micromax Canvas 4 Droidiser Rooting Kit.zip. This kit uses Motochopper, a tool intended to root Motorola Razr HD and similar phones but works good on Canvas 4.
  • Use a Zip manager to extract the kit you downloaded in the previous step to any folder of your choice. (7zip is our favorite tool for extracting stuffs. It is free and open source.)
  • Connect your phone to the PC using a USB cable. Don't enable USB Storage or any other mode. Just connect it as it is.
  • Go to the folder in which you extracted the rooting kit. Find a file named Run.bat in this folder. Right click on it and select Run as Administrator.
  • In the command window that opens on running the batch script, press Enter to confirm that you want to root your phone and follow any further on screen instructions
  • Reboot your phone.
Once your phone reboots, tap your app drawer icon and you must find an app named SuperSU. Check if your phone is rooted correctly. Use these must have root apps once you have successfully rooted your Canvas 4.

Exclusive: Embed Any Facebook Post on any website/blog

$
0
0
Facebook recently added an option to embed any public posts on websites and blogs. At the time of announcement, Facebook has given the embedding superpowers only to a few heavyweights of the web- CNN, Mashable, People, The Huffington Post and The Bleacher Report. If you are a website/blog owner and want to embed a post right now, just for the sake of fun maybe, here is your chance to do it.

How to Embed any Facebook Post on Any Website/Blog:

  1. Copy the code to embed any facebook post to the page you want to embed the post.
    <div id="fb-root"></div>
    <script>
    (function(d, s, id) {
    var js, fjs = d.getElementsByTagName(s)[0];
    if (d.getElementById(id))
    return;
    js = d.createElement(s);
    js.id = id;
    js.src = "//connect.facebook.net/en_US/all.js#xfbml=1";
    fjs.parentNode.insertBefore(js, fjs);
    }(document, 'script', 'facebook-jssdk'));
    </script>
    <fb:post href="FB_POST_URL"></fb:post>
  2. Go to Facebook and find any status update/photo that you want to share.
    Time stamp might be present here..
    or here...
  3. Find the date stamp of the post you want to embed. Right click on it and select Copy Link Address.
  4. In the code you copied in first step, replace FB_POST_URL with the url of the Facebook post you copied in step 3.
  5. The embedded post should look something like the one we have embedded below.


If you want Facebook's official method, you will have to wait till Facebook rolls this feature out to everyone, just like Tweets can be embedded by anyone.

Samsung claims innocent regarding overclocking S4 for superior benchmarks

$
0
0
As the tech world was abuzz with claims about Samsung overclocking Galaxy S4's processor for higher benchmark scores in Android Benchmarking tools like Antutu and Quadrant, Samsung had to clarify certain things. Samsung was being looked down upon for the foul play by many and I was eagerly waiting for an official response.

The issue was first brought into limelight when a forum memebr on xda claimed that Sasmung was using not-so-cool tactics to boost the Galaxy S4's benchmarks. Anandtech decided to test the claim and reached to this conclusion. Read the original claim Anandtach amde about Samsung overclocking the Galaxy S4 here.

Image Credits: Mashable
Samsung raised the topic on its Samsung Tomorrow Blog and stated that the Galaxy S4's GPU was designed to run at a max of 533 MHz whenever a full screen app, like games, S Browser and anything that's full screen, is running on the phone. In other normal apps, Galaxy S4 would automatically underclock the GPU to 480 MHz for battery savings coupled with optimal performance. The same explanations covers the overclocking of CPU. Prolonged use of some heavy games, though, brings the GPU back to 480 MHz so that the phone doesn't overheats.

What we think?

We found the explanation to be quite believable. Samsung Galaxy S4 packs a really enviable hardware and I don't think Samsung would opt for foul play to boost its shine further. Overclocking the CPU and GPU in certain apps is certainly being done in most multi-core devices in recent days. Also, the big.LITTLE architecture the international version of Galaxy S4 uses is based on the very same principle of switching to more powerful cores in case of resource intensive apps and games. And it is a well known fact that Benchmarking apps test the hardware to the limits, so the clarification looks justifiable.

To the end users and potential buyers of any device, we would recommend that you should never buy based on its Benchmark scores. They mean nothing in the real world.

Moto X officially launched; proves Specs really don't matter

$
0
0
Moto X must be the among the most rumored smartphones ever. Though the leaks and rumors made sure that the launch event that took place yesterday didn't pack any surprise for any of us. Except for the fact that the phone doesn't come at a very lucrative price, unlike Nexus 4 and that the phone won't escape the Western Hemisphere anytime soon. The 16 GB version would cost you $200 while the 32 GB version would be up for $250, both of which will come with 2 years of contract with various operators like AT&T, Verizon and a few others.

Moto X Detailed Specifications:

  • 1.7 GHz Dual Core Snapdragon S4
  • Quad Core Adreno 320 GPU
  • Two low power cores for Natural language processing and Contextual computing
  • Android 4.2.2 (almost stock), a GPE (Google Play Experience) version of the mobile with pure Android might be on the shelves soon.
  • 10 MP Rear camera with Clear Pixel technology (shoots images twice as fast, tackles motion blur)
  • 2 MP front camera with 1080p recording
  • 4.7" display with 312 ppi density
The Moto X looks better (and unique) than any phone you have ever seen
Customizable front, back, accent colors and a short message on the back of the phone make the phone truly yours. Those present in the event and had a chance to play around with the device say that the phone feels as snappy as the current Android flagships. With a comparatively outdated processor the Moto X, such snappiness can be brought in only with the help of great software customizations.

And a note to Non-US Moto X aspirants. Motorola's CEO Woodside has confirmed that in the coming months, Motorola will bring a cheaper version of the Moto X probably near the $200 mark. For me, that sounds like an alarming thing for local Indian manufacturers like Micromax and Karbonn who are building themselves on smartphones in this price range. A decent phone from Motorola at that price point might well be the last nail in the coffin for them. As we haven't had the opportunity to have a hands on the device (and probably will never have), we won't be covering this story in length. For that, we would refer you to the Great Gizmodo.

How to update Samsung Galaxy Tab 2 P3100 to official Android 4.2.2 Jelly Bean

$
0
0
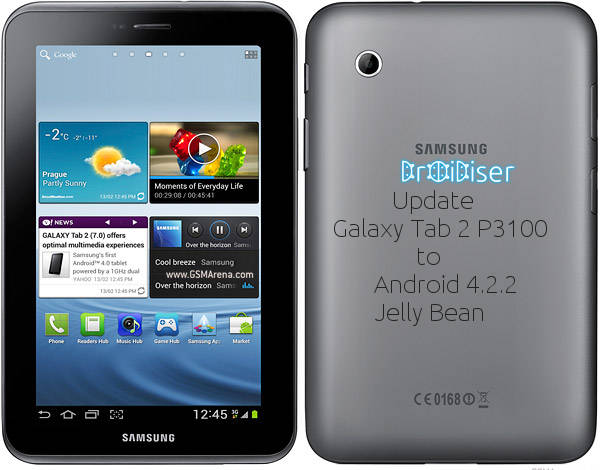
Samsung Galaxy Tab 2 P3100 has received an official Android 4.2.2 upgrade from Samsung. The update is released in France but will work on non-French Galaxy Tab 2 too. The update, weighing a massive 900 Megabytes in size brings in all the normal Android 4.2.2 goodies along with some performance improvements. In this guide, we shall post all the steps you need to update Samsung Galaxy Tab 2 P3100.

Note: Thanks to Ramu Bhat for bringing this to our notice and for helping us through this guide. He has tested the Android 4.2.2 firmware on his bought in India Galaxy Tab 2 P3100 and it works without our problems. Most official updates come through after rigorous testing already and thus, unlike many custom roms, are meant for day-to-day use. Bhat also stated that the total RAM showed up as 750 MB when he was on Android 4.1.2 but that has somehow rose to 811 MB in Android 4.2.2. Looks like Samsung has been able to squeeze out some RAM by lowering system requirements. A noticeable thing here is that Samsung hasn't released Android 4.2.2 even for its flagship Note 2 device, so Tab 2 P3100 users should be feeling very lucky right now.

Before you proceed:

  • Make sure that you have installed drivers for your Galaxy Tab 2 P3100 properly. Download KIES to do that.
  • This guide is supposed to work on Samsung GT-P3100 only. P3100 is the "with SIM" version of Tab 2. To confirm that you have the exact same device, go to Settings > About Tablet and see the information there.
  • This guide won't work on Galaxy Tab 2 P3100- China, Taiwan and Hongkong version.
  • Enable USB Debugging by going to Settings > Developer Options. Once you update to Android 4.2, you will have to unlock Developer Options first. That can be done by going to Settings >About Phone and then tapping the Build Number field seven times.

Stats for Nerds:

ModelGT-P3100
CountryFrance
VersionAndroid 4.2.2
Changelist1198223
Build DateMon, Jul 29,2013 02:17:49
Product CodeXEF
PDAP3100XXDMG6
CSCP3100OXADMG6
MODEMP3100XXDMF2

Guide: Update Galaxy Tab 2 P3100 to Android 4.2.2 Jelly Bean

  • Download the update (895.1 MB) from here or here. Extract the zip file you download till you get a .tar.md5 file.
  • Download Odin and extract the file. Run Odin.exe file.
  • Switch off your tablet. Wait for a vibration to confirm that the device has completely shut down. Now, press Power + Volume Down and keep them pressed till you get into Download mode. If a warning message appears when you boot into Download mode, press Volume Up to continue to Download Mode.
  • Connect your Galaxy Tab 2 P3100 to your PC. 
  • Jump to the Odin window you ran in step 2. In the Odin window, you must see an Added message which will confirm that Odin has successfully detected the tablet. If the message doesn't appear, make sure you have installed the drivers correctly.
  • In Odin, click PDA button and select the .tar.md5 file from the P3100XXDMG6 folder.
  • Now lets jump to setting Odin correctly for the flashing process. Don't mess with anything else other than the ones you are told.
  • Keep the tickboxes against Auto-Reboot and F. Reset Time checked.
  • Make sure that you have followed everything that is stated above as it is. Take your time. Take a deep breath and hit the Start button.
  • Be patient for the flashing process to complete. Once it completes, a PASS message will appear in Odin to state that everything went well and that the updating process is now done!
Galaxy Tab 2 Running Android 4.2.2 Jelly Bean                                          Thanks for the screenshots, Ramu Bhat

Alternative if you have Clockworkmod Recovery installed:

  • Download CWM flashable zip here.
  • Copy this file to your tablet's sd card.
  • Boot into Clockworkmod Recovery by pressing Power + Volume Up when you are switched off.
  • In cwm, select Wipe Data/ Factory Reset option. Then, go to Advanced and select Wipe Dalvik Cache option.
  • Finally, go to Install zip from sdcard and select the file you copied in step 2.
As the Auto-reboot option was set on, the tablet will automatically reboot when the process is doe. When the reboot is complete, your Galaxy Tab 2 will welcome you with the added sweetness of Android 4.2. Jelly Bean.

You might be missing out on a few Important Facebook Messages!

$
0
0
Though most Facebook users are unaware, there is a hidden inbox where some important messages might be lurking for them. And it is a good practice to keep a tab at the Other inbox in your Facebook account so as to make sure that you don't miss any important update.

Whenever you want to message a stranger, your message lands in that person's Other folder. And just like you, most others don't know that such a folder exists. That's why you never hear back from those old pals that unfortunately, aren't in your Facebook friend list.

Facebook provides a solution for that though. If you really need to get your message read by that stranger, then you can pay $1.00 (Though this charge might go to as much as $15 when you are trying to contact, say, a celebrity). This fee will let Facebook know that the sender has actually something important to say and isn't just spamming. The last line is how Facebook explains the fee it is charging. But a spam message that landed in my Inbox this afternoon proves that asking for a charge won't necessarily keep the spammers at bay.

Most of the times, though, the Other folder will receive newsletters from services you signed up using your Facebook email address. Still, it doesn't take hours to scroll down the subjects of the messages in there. On a different note, the charging system is still rolling out and as of now, my profile doesn't have that option. I am not sure if it has been rolled out in India or not. Do tell us about this in the comments section.

Update: It (the option to pay) is now appearing in my profile. Interestingly, it is asking for just 33 cents which translates to INR 21. That isn't going to burn a hole in your pocket if you are in dire need to contact a person.

Whether Facebook is right in charging the users for this is not what I am debating in this post. Facebook is already being criticized by a lot of its users for this. This post was just meant to let you people know that you should, at times, check your Other folder too. It can be accessed by going to the Other tab when you are in messages. On mobile version of Facebook, jump to messages and scroll down to the bottom. Click "View Other Messages"  to get to that folder.

Let's spread the word and let everyone know that they should check their Other inbox more often. Spreading awareness is the only alternative to paying to get a Stranger's attention. So, spread the word and share this story with your Facebook friends.

How to extract default/current wallpaper from an Android Device; Root required

$
0
0
It can happen with anyone. You lust for a wallpaper that you just can't find anywhere else on the internet. Given that your phone is rooted, there isn't any file on your android phone that you can't access. So, obviously, you can get to that wallpaper you've always wanted too. To help you through the process, this guide will let you know the location of the wallpaper on an Android device.

Starting with Android 4.1 Jelly Bean, limited availability of multiple user profiles was introduced. This caused a change in the location of the current wallpaper path. I am listing down the two locations, thus covering all Android versions (at the time of writing).

Getting to the root of your Device:

  • Get yourself a good file manager with root permissions. ES File Explorer is a good free one and can compete with any paid one. And yes, you heard it right. Root permissions are a must if you want to get down to that file.
  • Open the File Explorer app you are going to use.
  • If the current location isn't already / (i.e. the root of your phone), go there. On ES File Explorer, swipe to the left to access the Fast Access menu and tap on / Device.

Location of Current wallpaper:

  • For Android 4.0 and below:
    • Once in /, go to /data/data/com.android.settings/files.
  • For Android 4.1 and above:
    • Once in/, go to /data/system/users/0/.
  • Find a file named wallpaper in that folder and copy it to any location you want. Rename the copied file to anything.jpg or anything.png to open it as a normal image file.
Note: I tried manually putting a file named wallpaper in that folder. But doing so restored the original wallpaper on my mobile. Not sure how you can use this location to set your wallpaper manually, though I think trying to add a wallpaper this way is a simple waste of time. Still, if you somehow succeed to replace a wallpaper using this location, do let us know in the comments.

Location of Stock Wallpapers:

This is common for all versions of Android.
  • Go to /system/framework. Copy the framework-res.apk file from there.
  • Paste the framework-res.apk file anywhere and extract it.
  • In the extracted folder, go to /res and look for the wallpaper file in the  folders that start with drawable there. Depending on the resolution of your device, the file may be in any of the /drawable folders. An obvious tip would be to use the search option and search for the keyword "Wallpaper".
  • If you want to change the default wallpaper, you will have to decompile the apk (which you have already done) and then recompile it back and push it to your Android device. There is a tool named apktoolto help you in the process.
This guide will help you get some system wallpapers you had been craving for ages. I used this to get all the wallpapers from my friend's Micromax Canvas HD. In that post, I had promised you that I'd share the method and look, I just did that.

Deal: BH108 Universal Business Style Bluetooth Earphone for $12

$
0
0
Having a Bluetooth earphone can be pretty handy especially in scenarios when you need to talk to someone handsfree, like while riding your bike or driving. Of course, you always have the option of using your wired earphone, but a Bluetooth headset looks way cooler and doesn't needs to be untangled before use. The wirefree experience they provide is unanimously great.

Though decent Bluetooth earphones can set you back by about $30-40, so I was in a hunt for some less expensive Bluetooth earpiece that worked fine on most devices. One such option can be the BH108 Universal Business Style Mono Bluetooth Earphone.
Image Credits: Tmart

This mono earphone will work on almost all devices that have Bluetooth support, as indicated by the Universal tag in the item title. With Android getting support for Bluetooth Low Energy (BLE) in Android 4.3, keeping your bluetooth on to stay connected with the headset won't cause much battery drain. Measuring 5.3 x 1.5 x 2.2 cm, the earphone will easily slip into your pocket without you even noticing it. The Silver colored mono earpiece looks elegant in Silver color. With a 3.7V battery, it is reported to give the comfort of talking handsfree for about 5.5 hours while having a whooping standby time of 80 hours.

So, if you were looking to reward yourself with a Bluetooth Earphone, your search might end with this one. You can get it on tmart.com for the already mentioned price i.e. $12 ($11.91 to be precise) here. Otherwise, you can view other Tmart Bluetooth Headsets.

Review: Bitdefender Antivirus Free for Android keeps it secure, simple and light

$
0
0
With more and more malware coming on to celebrate the increasing popularity of Android ecosystem, it is increasingly becoming necessary to have an efficient Anti-virus installed. As I mostly stick to Safety Guidelines like, not sideloading untrusted applications and checking my sd card files on PC for any virus, I tended to stay away from an antivirus app on my android device. The reason being most of them are battery hoggers and heavy.

That’s where Bitdefender Antivirus Free for Android jumps in. I shall be discussing me experience with the antivirus in detail in this post. I don’t think that the name “Bitdefender” needs any introduction in the antivirus industry. Bitdefender Antivirus for PC has been a award winning product for years and is among the most popular security softwares for PC.

When you open the app for the first time, you are welcomed by a License agreement. If you have ample free time, do give it a careful read, though I was unable to find anything questionable here.

Antivirus Free: Simplistic UI, Minimal Interaction Required

As soon as you agree to the terms, you will be greeted with a minimal layout. A big colored Scan button will allow you to scan your complete device for any malicious looking app or file. The virus database is stored online and that’s why you will need to be connected to the internet while running the scan, That isn’t anything you will question since most of us are connected 24x7 to the internet anyways. The plus point of the databses being stored in the cloud is that you won’t ever need to manually update your virus database, a feat rarely showcased in any other Android antivirus app I’ve used. Also, it counts for a better accuracy in scan results. (Remember AVG falsely flagging Nova Launcher as virus?)

The color of the Scan button is an indicator of your Android Device’s health status. The three colors you see everyday at traffic signals indicate the normal meanings: Green signalling that your device is pretty secure, Yellow indicates that some not-so-critical issue has been found and the scary Red means that you might be under attack need to take some immediate action.

Taking Antivirus Free on a Test Ride:

The scan flagged Z4root app, the app which was used to root good ol’ Froyo devices, as a virus. The app itself isn’t a virus but contains an exploit. Most PC antiviruses mark it as virus, so I had installed it intentionally for giving AntiVirus Free a test ride. It also marked the apk file of the same application I had stored in the sd card as a Virus. Understandably, the Scan button got fiery and turned Red. As soon as I removed the culprit application and apk file, all was well and the Good Green light replaced the Red one. Simple.

Configuring Antivirus Free:

At about 1 megabytes, the application is pretty lightweight and that explains for the point I mentioned earlier about the app not being a battery hogger. The only service running in the background is the one that keeps checking installation of new apps for virus protection. This service, named AutoPilot, can be turned off by tapping the Menu icon in the app (the three dots) and jumping to Settings. The only two other configurable options Settings include an option to toggle scanning files present in sd card (both internal and external) and to upgrade to Advanced Protection which offers features such as Web Security, Anti-theft among others.

Screenshots:

Click any screenshot to view it in full size.


Conclusion:

We really loved the fact that you can just install the app and forget everything. Just leave the Settings as it is and you will stay protected without you needing to do anything. The simplicity and lightness of the app is almost unmatched. AntiVirus Free might not provide the Most Advanced Protection ever, but it is still good great at what it does. On a 10 point scale, we shall give it 8.5 points. A 4.6 star rating on the Play Store (play store ratings are out of 5) speaks volumes about the app.

Note: Though this review was sponsored, we have written our honest experience with the app. Under no circumstances we shall, ever, accept a payment for a biased review.

Giveaway [International]: Win a Zinio e-subscription of your favorite magazine for free

$
0
0
It's been quite a while since we ran the last giveaway on Droidiser. To brush your memories, or for those of you who joined our bandwagon recently, the last giveaway was that of a Micromax A110 Canvas 2. That time, there was only one winner. This time, we are giving away 10 digital subscriptions of any magazine of your choice. So, you have literally 10x more chances of winning this time around!

What is Zinio?

Zinio is the company that is sponsoring this giveaway. Zinio has its presence felt with over 5000 magazines which can be accessed from different platforms- Android, iOS and Windows. If you are unlucky and doesn't get any of the free subscriptions, Z-Pass is the thing you might be looking for. Z-Pass, by Zinio, allows you to have 3 of your favorite magazines free for the first month. All this delicacy can be renewed in the following month for just a fiver ($5 = `300). If you still don't want to shell out that $5, you can feed yourself with some free articles!

Screenshots from the Zinio for Android app

Giveaway Rules:

This giveaway is open to every Homo Sapien out there. As the title says, this giveaway is international and it doesn't require any credit card or other personal information from the winner(s) (there is no catch).

All you have to do to enter the giveaway is either use your email address or use your facebook account to be a part of the draw. All further steps are optional and will gain you an extra entry, to boost your chances of winning. You must comment on this post (using the disqus plugin) with your Full Name, Email Address and the Magazine you want to subscribe for.
Notable choices available to you

You can choose any of the tiles from Zinio's website. Subscription length depends on the Magazine title you choose. You can find that in the short description below the Magazine's title. For instance, How It Works' 13 issues can be yours for free, which would otherwise cost you `2251 ($37).

Winners shall be contacted by email on the 27th of August. If the Giveaway Widget by Punchtab doesn't appear, try a different browser and let the page load completely. This can take a while if you are on a poor connection.

Hot to fully backup non-rooted Android devices

$
0
0
When you get an Android phone for the first time, you may be surprised at all of the programs and games available in the Android play store. You need to learn ways to back up your data, as well as your contact information. Even the best Android phones will have an occasional glitch or you may lose your phone and want the opportunity to restore the data. You should look for an app that will allow you easily sync your phone with another device so that you do not lose everything. These apps will also make it easy for you when you are ready to upgrade to another phone.

We are covering the best ways to backup your Android device. Depending on the Android version you are running, the methods differ a bit. If you are unsure about whether you should root your phone, rooting allows you to take a true full backup of your device (which can be restored even when your phone is stuck in a bootloop) along with many other perks. In case you do decide to root your phone, use Titanium Backup to backup your apps and Clockworkmod Recovery to take a complete nandroid backup.
Image Credits: Closari (Flickr)

For Android devices running on Ice Cream Sandwich (Android 4.0) or above:

Helium:

This app is designed to allow to easily sync your phone. Many of the programs have you root your phone, which has it drawbacks, but Helium does not make you do that. You have the option of backing up to the Cloud or to an SD card. It also allows you to sync all of your Android devices to each other. This works even if the devices are on different networks. With Helium installed, you can schedule automatic backups and take the worry out of syncing your phone. This program is one of the best available and should be the first one you look at when you want to back up your Android phone on a regular basis.

Holo Backup:

Formerly known as Simple ADB Backup, Holo Backup is another option that you can use if you do not want to root your phone. This is a free program that allows you to connect to your computer to complete the back up. You will need to use the app and make sure that your settings are set to simple debugging mode. This will allow you to connect to your computer with a USB cable. Then you simply launch the app, and you can easily back up your phone. This method does require you to remember to sync your phone on a regular basis on your own, but it is free and does give you a solid way to back up your phone. Also, this tool needs you to haveinstalled proper drivers on your computer. If this tool doesn't get to work, try getting adb to work first.

My Backup Pro

My Backup Pro is an app that allows you to create a backup of your Android phone without rooting the phone. It has a thirty-day free trial, and it costs just $4.99 to buy. This app allows you to complete a cloud backup to the servers at My Backup Pro or to your SD card. They also allow you to easily schedule the backups that you need. This app has good reviews at the GooglePlay store. It is worth checking out if you need a reliable backup tool.

For Android devices running on Gingerbread (Android 2.3) or below:

Due to Android limitations, below Gingerbread, apps can'e be backed up along with their data unless you are rooted. Still, you can use App Backup & Restore to backup apk files of your applications. Apart from applications, there are stuff like your SMS, contacts and call logs that might be dear to you. To back these up, you can use the free Super Backup app.
Image credits: mia.judkins, Flickr

Conclusion:
After you have backed up your phone, remember that you can get your phone cheap at Amazon through coupon codes. You can also score a good deal on a second phone by shopping online. These options also let you move away from the contract plans. No matter what type of Android phone you have, you do want a reliable way to back up your phone. These methods work for the best Android phones available.

Author Bio :Emma Watson is a writer for Promocode4share.com. She is a professional blogger, college English teacher. She is passionate about technology, fashion, beauty, and everything about online shopping. You can find Emma on Google+

Funny Funny Cat Videos is a lovely app, given you love cats

$
0
0
If you or your kids are fond of cats and find them cute, you will find the Funny Funny Cat Videos app worth a download. Released not so long back, the app currently has a 5 star rating which proves that those interested in cats are really finding the app to be great.

As the name tells, the app contains handpicked videos from youtube. The selection of videos is synced from time to time. I don't need to say anything about the streaming of the videos as the app just opens up the mobile version of youtube and the streaming will be handled by the native youtube app.

Apart from Cat Videos from youtube, the app also contains a picture puzzle games. No rewards for guessing who stars in the pictures. Yes, Cats! The Picture puzzle games are a really popular genre of gaming, especially for kids.

If the app devs are listening, I would want them to work on bettering the user interface of the app a bit. The app currently has 4 tabs: Cat 1, 2, 3 and 4. The first three tabs contain videos while the last tab contains puzzles. It would be more organized if one tab was dedicated to videos and the other tab was meant for the puzzle section. Also, a swipe to change tabs would be a more pleasing experience for the user.

Snapshots:


Final Words:

The app is good at what it does. I didn't face any force closes, so the app is quite stable. The only thing we would love to change is the way the app is presented.As the app is free to download, there is no one stopping you to fill your appettite for cats by downloading the Funny Funny Cat Videos app.

Droidiser Review Rating:

★★★★★★★☆☆☆
         7 out of 10


Get it on Google Play
Viewing all 557 articles
Browse latest View live